Canada Web Hosting
Webmail Domain Control Hosting Panel
 
Home
Plans
Domains
Customer Service
About Us
Design  
Signup/Renew
ehosting.ca
Site2Go.ca
Store2Go.ca
Web Hosting
Basic
StarterPlus
Pro
WordPress Optimized
VPS Servers
Dedicated Server
Dedicated Servers
Backbone

Site2Go
Site2Go Biz
Store2Go
Ecommerce Hosting
Smart Seller
Giga Seller
Store2Go SEO


Search Engine
Optimization

Current Promotion: Store2Go Cut Back Prices
Domain Registration
Domain Privacy
Free Domain Name!
Order/Transfer Domains
Bulk Order/Transfer

WhoIS
Accounts
Domain Control Panel
Hosting Panel
VPS Panel
Account Renewals
Rebate Centre
Referral Centre

LiveHelp
LiveChat
Self Serve
Webmail
FAQs
Tutorials
Server Settings
System Status
Spam Control

Contact Us
About Us
eHosting.ca Contests
No contests at this time

JuditGueth.com Case Study
About ehosting.ca
Client Testimonials
Why choose Us?
Dedicated Server Backbones

Press Releases
Community Relations

Contacts
Contact Us

Careers
Thunderbird
New Signup
Signup Now
New Hosting and Domain
Domain Registration Only
Dedicated Server

Renew
Account Renew
  Home > Customer Service > Help > Tutorials


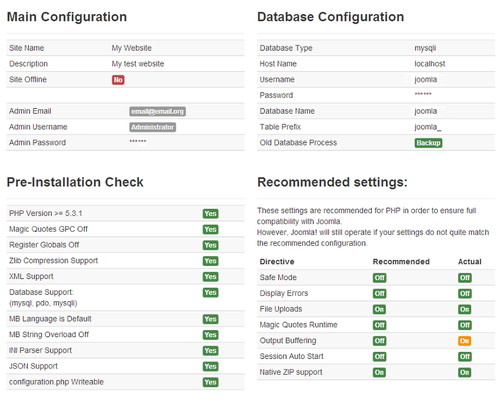
Joomla Installation Tutorial

FTP (File Transfer Protocol)
Other email client tutorials:
 Eudora 5.2
 Outlook Express

 Mac Mail

 Outlook XP


Before installing Joomla, please check to make sure your hosting account has MySQL database. The recommended Hosting Plans for WordPress are Economy, Starter, and Pro Plans.
 

1. Download the latest version from Here


2. Unzip the files onto your local computer to a separate directory.

3. Upload all the files from that separate directory to your FTP's sub-directory or subdomain (of your choice).

4.Please contact us for confirm your site is changed to use the latest PHP version that Joomla required.


5. Then enter yourdomain.com/yourdirectory/index.php to commence the installation process. The installation looks like this:


6. Remember to completely remove the installation directory.Then follow the screenshot below and copy and paste it on to a NotePad and save this file as configuration.php, you need to upload this back to your Joomla root directory to complete the installation.

7. If you have further questions, follow the Joomla Documentation here and select "Installing Joomla!

8. Installation is complete. You now have your own Joomla CMS.


  Back to Main Menu 
   
   
  Copyright © 1999-2021, Mecca Internet Solutions.  All rights reserved.  604-273-2077 Contact Us | Terms of Use | Privacy Policy | FAQ
  Free Domain Name | Canadian Dedicated Servers | Signup Now | Server Settings | System Status | Hosting, Domain Renewals | Domain Registration Agreement | ICANN Policy | ICANN Registrant Rights & Responsibilities